The Armoury.
Everything you need to know about your suit of armour, in one place: how it was made, what it is made of, how the finish was built up, how to wear and look after it, and exactly which file to ask for if a piece ever needs replacing.
A full suit of fantasy plate, printed piece by piece and built around one specific body.
The armour started life as a high-detail game sculpt. That digital model was broken into printable parts, scaled and re-shaped around a 3D scan of the wearer, printed in ABS on two Bambu Lab printers, then filled, primed, sprayed, airbrushed and weathered by hand. Rigid pieces attach to a soft harness underneath so the weight sits on the shoulders and hips, not on the plastic.
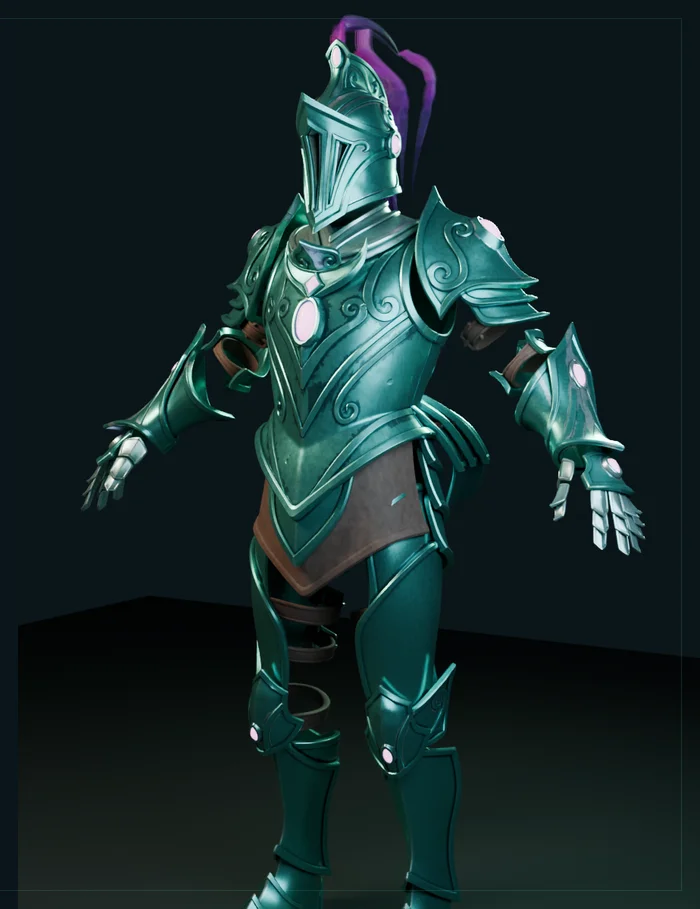 Digital master
From game sculpt to real parts
The original ZBrush model had 160 sub-tools. Each was repaired, closed and turned into a watertight printable master, then grouped into the roughly one hundred pieces you can hold.
Scanned, not guessed
The wearer was captured with a handheld 3D scanner. Every region of the suit was scaled and placed against that scan, so the chest, arms, thighs and helmet each sit at their own fitted size.
Split for the printer, joined with magnets
Large shells were cut into bed-sized pieces with hidden dowels and glued back into single parts. Pieces that need to open, like the forearm tubes and the chest, close on concealed neodymium magnets.
Finished by hand
Filler primer, sanding, a chrome base, satin turquoise, an airbrushed green-blue and a thin metallic amber-green glaze, then weathering. The recipe is written down below so it can be matched.
Every piece has a code. The codes are what the parts register below is filed under.
The colour map shows each logical component as its own colour. Tap a region to jump straight to its files in the register.
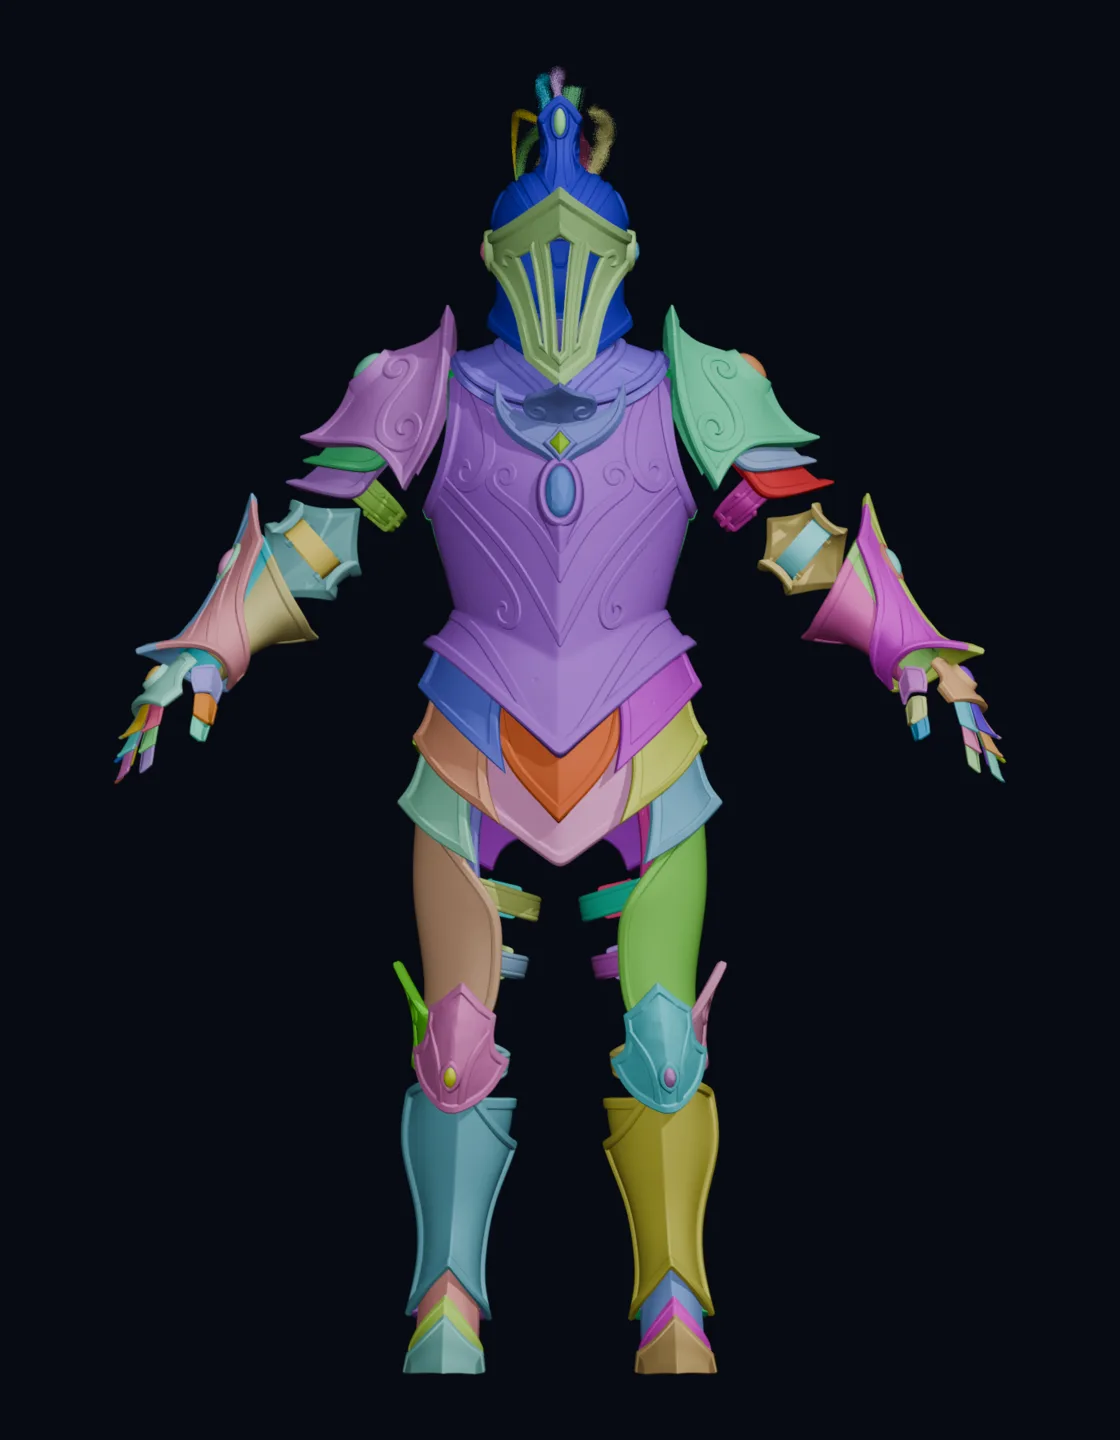
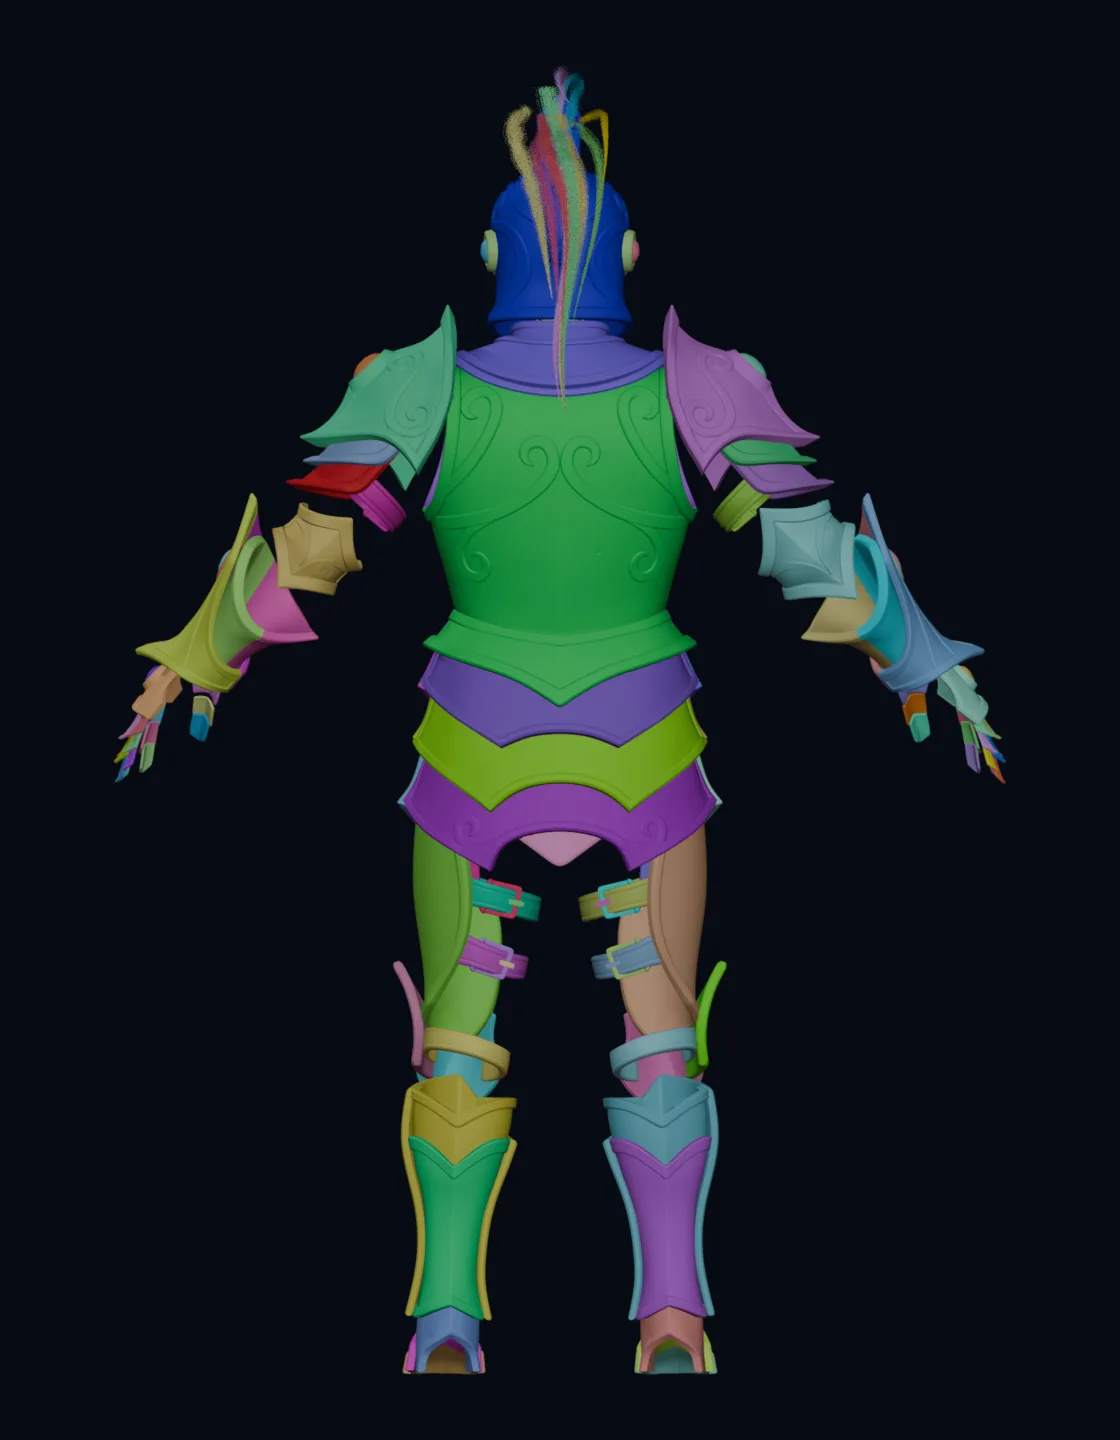
Four layers make the colour. Everything else is weathering on top.
The armour’s green-blue metal is not one paint. It is a chrome base showing through a satin turquoise, tinted by an airbrushed green-blue and glazed with a thin metallic amber-green. If a piece is ever repaired or reprinted, follow the same order and it will match.
Prep before paint
- Simoniz High Build Primer Putty Filler spray, 500 ml, to fill print layer lines
- Hycote Bodyshop High Build Grey Primer aerosol, 400 ml, for the second primer pass
- Wet and dry sanding sponges, 80 to 3000 grit, plus a NeoSander detail pen sander
- Acetone for smoothing ABS and for slurry joins on unpainted parts
Weathering & detail
- Vallejo Model Color Smoke, thinned, into recesses and panel lines
- Vallejo Engine Grime weathering effect for grime around edges and joints
- Vallejo Model Color Silver (Metals) and Vallejo Premium Color Gunmetal for chipped and worn edges
- Vallejo Premium Color Pearl & Metallics Silver and Silver Antique metallic acrylic for highlights
- Rub ’n Buff Pewter buffed onto raised ornament
- Vallejo Premium Color Blue Green for airbrush tinting and blending repairs
- Airbrush thinned with Vallejo Airbrush Thinner and Airbrush Flow Improver; dry-brush set and foam brushes for the weathering passes
Tried and rejected colours
- Hyper Teal Pearl high-metallic basecoat aerosol, too blue and too bright
- Maston Metallic Gloss Green spray, too green
- Maston Zero Dark Green RAL 6005 spray, too dark
Touching up a chip
Small marks
Clean the area with a damp cloth. Dab a little Vallejo Green Blue with a fine brush, let it dry, then glaze the spot with a very thin coat of the Amber Green metallic and blend the edges with a dry brush. Finish with a touch of Smoke if the surrounding area is weathered.
Repairing a break
Cracks and splits
ABS can be re-bonded with E6000 or a two-part epoxy. Sand the join flush, re-prime with filler primer, then rebuild the four colour layers locally, feathering each one a little wider than the last. Avoid cyanoacrylate superglue on visible faces; it blooms white.
Reprinting a part
Fresh pieces
Ask for the part by its code and file name from the register below. Print in ABS at 100% scale, then prime, sand and paint with the full recipe. Gems are printed in translucent PETG and are left unpainted so the LEDs can shine through (the two small hand gems are unlit).
What it is actually made of.
Product names below are the ones on the receipts, so the same things can be bought again.
Plastics
Printed in ABS
- SUNLU ABS Silver 1.75 mm is the main structural material for every shell, printed at 0.4 mm nozzle
- iSANMATE ASA and eSUN ASA Grey for parts wanting extra UV and heat resistance
- ERYONE translucent PETG for the light-up gems, printed hollow at 1.0 to 1.4 mm walls
- CC3D PBT Pro Black and eSUN ABS+ HS Natural for fixings, pads and inserts
- SUNLU PLA+ Grey and eSUN Light Weight PLA were used for test fits and prototypes only
Fixings
Magnets, inserts & bolts
- Neodymium disc magnets 5 × 2 mm (and 8 × 2 mm at the big closures), recessed and glued, polarity marked
- ShineNow M4 brass heat-set inserts with M4 × 10 black stainless flanged button screws and washers for strap anchors
- Heavy-duty 21 mm sew-on popper snaps and 4 mm eyelets on the soft goods
- E6000 Plus clear glue for reversible bonds; ABS slurry (acetone) for permanent shell joins
- Black hot glue is used only for cable tidying, never for load
Soft goods
Straps & harness
- Soft corded flat elastic, 25 mm and 50 mm in coyote and brown for the arm, pauldron and knee retention
- TECEUM 25 mm webbing (brown and charcoal) with sourcing map cam buckles for adjustable runs
- MOLLE straps, D-rings and quick-release clips on the load vest and hip belt
- Sew-on and 3M self-adhesive hook and loop; jute twine and 32 mm polyhemp rope as dressing
- Braided stretch belt, elastic armbands and sleeve garters to close the costume layers
Lighting
Gems, LEDs and a fan
- Avvchuy waterproof submersible LEDs with remote control sit behind the gems in printed pucks; the same pucks are used everywhere, including the helmet
- Eleven of the thirteen gems are lit. The two small hand gems have no LED behind them; there is no room
- In the helmet the pucks sit in drop-in side tubes behind the visor-end gems and in the crest socket
- A Noctua NF-A4x10 5V 40 mm fan pocket under the crest channel moves air through the helmet; powered over USB
- EL wire and RGB tea lights were bought for tests and are not part of the final build
Costume
Worn underneath
- LVCBL brown medieval trousers (2XL) and a PARKLEES brown lace-up shirt (XL)
- WTACTFUL brown tactical gloves (L) carry the printed hand and finger plates
- Skechers Go Walk Max, UK 11 are the shoes the foot armour was scanned and fitted to
- Helmet foam pad set and 10 mm self-adhesive foam for comfort padding
Tools that came with the job
Bought for this build
- Creality CR-Scan Ferret Pro handheld 3D scanner, used to capture the wearer
- Airbrush with a no-clean bottle kit, 80 W soldering iron for heat-set inserts, flush cutters
- A 3 × 3 m pop-up gazebo as the spray shelter
Dress from the inside out. Allow thirty minutes and a second pair of hands for the chest.
The soft vest and belt underneath carry the weight. Rigid parts only ever clip, strap or magnet onto those layers or onto each other, so the order matters.
Handling
Day to day
- Carry shells by their bodies, never by a lame, a peak or a strap tab
- Magnets hold position only; they are not meant to carry weight or shear
- Set every strap length in the crouched pose, not standing upright
- Two dressers for the chest close; a stand or hook to park the front shell helps a single dresser
Care
Cleaning & storage
- Wipe with a damp cloth and mild soap; no solvents, no alcohol wipes on the paint
- Keep it out of hot cars and direct sun for long periods; ABS softens and warps well below 100 °C
- Store shells on their padded interiors or hung by straps, not stacked under weight
- Remove the LED pucks and batteries between events; the fan and lights run on USB and coin cells
- Check magnet seats and glued tabs before each wear; re-bond with E6000 if anything lifts
Renders, concept art and the design work behind each region.
Turntable
The suit on the registered body scan, rendered in Blender from the exact print geometry. Thirty-six frames at ten degrees. The translucent figure is the scan the armour was fitted to.
Every printed part and the exact file it came from.
If a piece is lost or damaged, quote the part code and file name and it can be reprinted to match. Open the register, then search by name, code, region or file. Click a row for the full path, release and notes.
Open the parts registerLoading…
–↓
| Region | Part | Code | Side | Qty | STL file | Release | Status |
|---|
Assembly guide V1
Illustrated guide to how the components go together. Predates the final helmet and forearm revisions.
Project progress report
The full technical report at the V37 digital checkpoint: fit studies, clearances and release history.
Glove plate placement
Where each of the thirty finger plates and two hand plates sits on the gloves.
Questions, repairs, spare parts or a new piece to match: get in touch and quote the part code. Every file in the register is kept in the project archive.
Email Tom